Steam loco tenders provide convenient space for batteries and decoders. However, wiring between tender and engine can easily become an untidy tangle making it difficult to separate engine and tender and sometimes restricting free movement of the tender's leading truck. A client (Bill) and I have jointly undertaken S-CAB conversion of a brass loco; he is re-motoring the loco and I'm responsible for installing a complete S-CAB system in the tender. We needed a connector between tender and loco and Bill suggested I look at SoundTraxx DBX-9000 wiring kit.
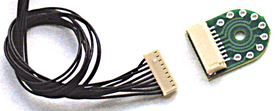
It provides a 9-pin socket and a compatible cable harness with wires that are thin, flexible and black. Nine wires is more than we need, but the unused wires are easily removed from the plug. Bill's project required only 5 wires; 2 for motor, 2 for headlight and 1 for right-rail pickup. I assigned pins in conformance with NMRA specs for a 9-pin JST socket. The center mounting hole fits a 2/56 screw. For installation, the first idea is to mount the DBX circuit board on the underside of the tender chassis.
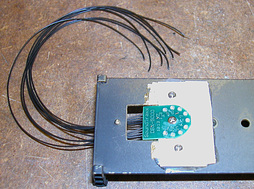
The flaws in this simple plan were soon apparent. The tender chassis (floor) is solid brass sheet, so we need insulation. We also have to cut a hole to route wires from inside to the underside of the tender. However, the show-stopper was insufficient clearance to accommodate the DBX between top of the tender's leading truck frame and the tender floor above.
A Better Plan
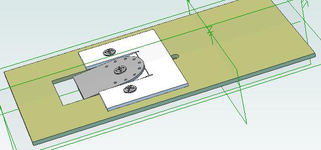
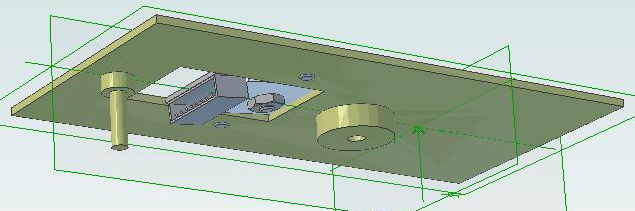
Mounting the DBX on top side of the tender floor is more complicated but has several advantages. Not only can the engine be unplugged from the tender, but the DBX, with wires attached, can be separated from the chassis, making it much easier to access most of the S-CAB components, which are mounted in the body of the tender. The speaker is the only item directly attached to the tender chassis.
This installation required a rectangular opening in the tender floor, which I admit was tedious work. The DBX is mounted on a piece of styrene sheet which provides insulation from chassis and allows the DBX to be tilted downwards to unplug the engine cable harness.
This installation required a rectangular opening in the tender floor, which I admit was tedious work. The DBX is mounted on a piece of styrene sheet which provides insulation from chassis and allows the DBX to be tilted downwards to unplug the engine cable harness.
Here are top and bottom views from a 3D CAD design. If you have an up-to-date version of Adobe try this link to view a 3D file.
 |  |